Creative Spring Door Decorations for School: Ideas to Brighten Up Your Classroom
As the winter chill thaws and the first green buds appear, there’s an undeniable urge to refresh our surroundings. This is especially true in educational spaces, where the environment directly influences mood, creativity, and learning. One of the most impactful and joyful ways to herald the new season is through creative spring door decorations for school. More than just a craft project, transforming a classroom door into a vibrant spring scene acts as a daily dose of inspiration. It welcomes students with color and whimsy, fosters a sense of community, and turns a mundane threshold into a celebrated gateway to discovery. This guide will explore how this simple act of decor can profoundly transform the atmosphere of a learning space, making it brighter, more engaging, and emotionally resonant for everyone who walks through it.
Introduction to Creative Spring Door Decorations for School: Ideas to Brighten Up Your Classroom
Imagine the hallway of a school in early March: often a neutral, sometimes sterile, environment. Now, picture a classroom door transformed into a blooming garden, a cheerful rainbow after a spring shower, or a bustling hive of friendly bees. This immediate visual shift does more than just beautify; it signals a change. It tells students that this is a space of growth, creativity, and warmth. The act of creating spring classroom door ideas is inherently collaborative, often involving teachers and students working together, which builds ownership and pride. The aesthetic appeal is clear—bursts of pastels, vibrant greens, and playful motifs replace the monotony of blank doors. Functionally, a well-decorated door can serve as a learning tool, reinforcing themes like plant life cycles, weather patterns, or literary concepts. Emotionally, it provides a bright, positive first impression that can alleviate anxiety and boost spirits. For the DIY enthusiast or the budget-conscious educator, this is a low-cost, high-impact project that maximizes creativity over budget. Ultimately, these spring door displays are not mere decorations; they are a statement of care and an investment in the emotional landscape of the school day, transforming a simple door into a canvas for joy and learning.
Why Choose Creative Spring Door Decorations for School: Ideas to Brighten Up Your Classroom for Your Space
You might wonder why to invest time and effort into decorating something as transient as a classroom door. The reasons, however, are deeply rooted in educational psychology and community building. Firstly, these seasonal door decor projects create an immediate sense of belonging and identity. A uniquely decorated door helps younger students easily identify their classroom, while for all ages, it fosters a sense of “our space.” This visual marker promotes pride and responsibility. Secondly, the process and result directly impact the learning atmosphere. Studies show that well-designed, aesthetically pleasing environments can reduce stress and increase engagement and motivation. A bright, cheerful spring-themed door acts as a daily visual cue that this is a place for growth and new beginnings.
Furthermore, this approach stands out because it is inherently inclusive and adaptable. Whether you’re a teacher with a room full of eager helpers, a parent volunteer, or a styling professional looking to enhance a school’s brand, the project scales beautifully. It maximizes visual harmony by allowing you to extend your classroom’s interior theme right to the doorway, creating a cohesive and inviting journey from the hall into the learning space. For renters of the space (in this case, teachers who may change rooms), most DIY spring door ideas use removable materials like paper, fabric, and tape, offering a non-permanent transformation that respects the school’s property. In essence, choosing to implement creative spring door decorations for school is a choice to prioritize emotional well-being, community, and the powerful message that learning is a vibrant, ever-renewing process.
Key Elements & Design Components
Essential Decor Items for Creative Spring Door Decorations for School: Ideas to Brighten Up Your Classroom
To bring your spring door masterpiece to life, you don’t need a professional’s budget—just creativity and a few key components. The foundation is a cohesive color palette. Think soft pastels (lavender, peach, mint, butter yellow) paired with vibrant spring greens and sky blues. These colors form the backdrop of your design. Next, consider the central motif or theme. This is the star of your classroom door display. Popular and effective choices include:
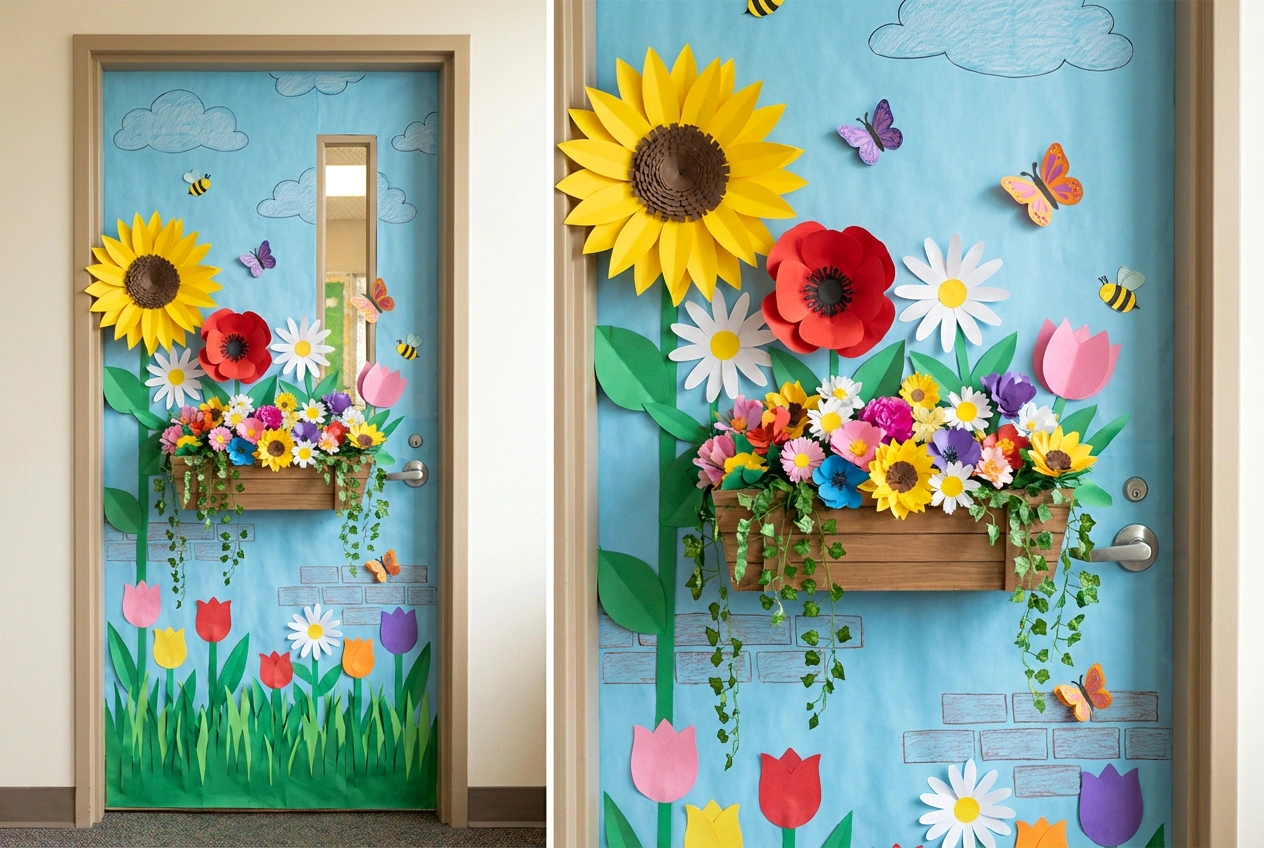
* A Blooming Garden: Giant 3D paper flowers, a picket fence along the bottom, and plenty of greenery.
* A Friendly Spring Animal: A large, cheerful ladybug, butterfly, bunny, or bird with a nest.
* A Weather Theme: A bright sun with ray-like student names, a rainbow with a “pot of gold” bookshelf, or fluffy clouds.
* A Literary Connection: Decorate based on a spring-themed book your class is reading.
Essential materials are often simple: butcher paper or craft paper for the background, an assortment of colored construction paper, cardstock, and tissue paper for dimension. Don’t forget adhesive—painter’s tape is ideal for the door surface, with glue sticks and double-sided tape for assembling pieces. For texture and impact, incorporate items like paper plates (for suns or flowers), cotton balls (for clouds or bunny tails), and green streamers or crinkle paper (for grass). A budget-friendly splurge could be using removable vinyl decals for key elements, which are durable and can be reused.
Style Variations & Budget-Friendly Alternatives
The beauty of spring door art is its flexibility. For a minimalist, modern look, focus on clean lines and a limited color scheme—perhaps a simple, elegant tree branch with budding pink blossoms made from tissue paper pom-poms. A rustic, nature-inspired theme might use burlap as a background and incorporate real twigs and faux leaves. For those with zero budget, recycled materials are your best friend. Create flowers from egg cartons, use old newspaper for papier-mâché bugs, or cut shapes from cardboard boxes. Student artwork is the most meaningful and cost-effective material of all; their hand-drawn flowers, butterflies, or self-portraits can become the entire decoration. If your door has a window, use liquid chalk markers to draw directly on the glass for a completely residue-free option. These affordable spring decor alternatives ensure every classroom can participate, proving that the most impactful transformations often come from creativity, not cost.
How to Achieve the Look: Step-by-Step Styling Guide
Transforming your classroom entrance with spring door decorations is a manageable and fun process. Follow this step-by-step guide to ensure a stunning, cohesive result.
Step 1: Theme and Planning
Before cutting a single piece of paper, decide on your theme. Collaborate with your students for ideas—this builds buy-in. Sketch a rough layout on paper. Consider the door’s dimensions and any windows or handles you’ll need to work around. Decide on your color palette (3-4 main colors work best) and make a list of the large, medium, and small elements you’ll need (e.g., large sun, medium clouds, small flowers).
Step 2: Preparing the Door Canvas
Clean the door surface with a dry cloth to ensure good adhesion. Create your background. You can cover the entire door with a solid color of butcher paper, or create a scene—blue paper for the sky on the top two-thirds and green for grass on the bottom third. Secure it firmly with painter’s tape at the corners and edges. This step sets the stage for your entire spring door display.
Step 3: Creating and Attaching Central Elements
Now, build your main focal point. If your theme is a “Garden of Readers,” construct large 3D flowers. Layer different colored paper petals, curl the edges with scissors, and attach them to a central circle. Position this focal point slightly off-center for visual interest, using double-sided tape or sticky tack. For a “Spring into Learning” theme with a bunny, assemble the bunny’s body and head separately before placing it on the door.
Step 4: Adding Secondary Details and Texture
This is where your scene comes to life. Add secondary elements like grass, clouds, leaves, or a picket fence. Use streamers cut into fringe for grass, cotton balls stretched for clouds, or folded accordion-style paper for 3D butterflies. Layer these around your central element to create depth. Texture is key for engaging classroom door art.
Step 5: Incorporating Interactive or Personal Elements
Elevate your decor from display to experience. Add a interactive element like a “What’s Blooming in Our Class?” section with student photos in the centers of flowers. Write each student’s name on a ladybug spot or a rainbow stripe. This personal touch makes the seasonal door decor truly meaningful and ensures every child feels represented.
Step 6: Final Review and Securing
Step back and look at the door from a distance. Check for balance—is one side too heavy? Are colors distributed evenly? Ensure all pieces are securely fastened, especially along edges that might catch in the hallway breeze. Add any final accents, like a welcoming message in bold letters: “Welcome to Our Spring Fling!” or “We’re Blooming with Kindness.”
Elevating the Look: Advanced Styling Tips
Once your basic spring door decoration is in place, a few advanced touches can make it extraordinary. First, consider lighting. If there’s a hallway light above, ensure it shines favorably on your door. You can add subtle sparkle by incorporating a few iridescent cellophane pieces among flowers to catch the light, mimicking dew. Second, play with extreme dimension. Instead of flat paper, use pool noodles sliced in half and covered in green paper for a dramatic 3D caterpillar. Craft stores sell inexpensive paper lanterns that make perfect bumblebee bodies or giant flowers.
For a truly polished look, pay attention to typography. Cut your welcome message or theme title from high-contrast, elegant fonts using a Cricut machine or carefully print and cut them out. Framing your display with a simple border of twisted crepe paper or a faux vine can neatly contain the scene. Finally, think beyond the door. Extend the theme a few feet into the hallway with a matching bulletin board or a trail of paper footprints leading to the entrance. This creates an immersive experience and makes your creative classroom entrance a landmark in the school.
Maintenance & Care: Keeping Your Space Fresh
Your beautiful spring door display will need some care to last through the season. Dust and hallway traffic can cause edges to lift or materials to fade. Perform a weekly “touch-up check.” Gently press down on any lifting corners with fresh painter’s tape. If using tissue paper elements, be mindful of high humidity which can cause them to sag; a light spray of hairspray can sometimes stiffen them. For cleaning, never use wet cloths on paper decorations. Instead, use a dry, soft paintbrush or a can of compressed air to gently dust the surface.
When the season ends, removal is just as important as installation. Carefully peel off painter’s tape at a 45-degree angle to avoid damaging the door’s finish. If any adhesive residue remains, a small amount of Goo Gone on a cloth (tested in an inconspicuous area first) can remove it. Store reusable, flat elements like laminated pieces or vinyl decals in a large portfolio or between sheets of cardboard. By maintaining your spring door decorations, you ensure they remain vibrant and welcoming until it’s time for the next seasonal transformation.
FAQs: Frequently Asked Questions About Creative Spring Door Decorations for School: Ideas to Brighten Up Your Classroom
Q: What are some quick and easy ideas for spring door decorations if I’m short on time?
A: Opt for a simple, high-impact theme. A “Showers of Kindness” door with a large blue umbrella and paper raindrops containing student names is fast and lovely. Another is a “We’re Blooming” door with just a few giant, pre-cut paper flowers. Using a large, colorful paper wreath as a focal point is also a speedy solution.
Q: How can I make my spring door decorations inclusive for all students?
A: Ensure the theme is universally appealing and avoid motifs tied to specific cultural or religious celebrations of the season. Use a broad nature theme like gardens, insects, or weather. Most importantly, include every student’s name or contribution visibly on the door, so everyone sees themselves in the final product.
Q: Are there rules about what I can put on my classroom door?
A: Always check your school’s or district’s fire and safety codes first. Common rules include: decorations cannot cover more than a certain percentage of the door (especially the window, if it’s a fire door), materials must be flame-retardant, and nothing can obstruct the hallway or door operation. When in doubt, ask your administration.
Q: How can I involve my students in creating the door decor?
A: Involvement is key! They can vote on the theme, trace and cut out simple shapes, color elements, write their names, and help with placement. Assign small committees for different tasks. The process is a fantastic opportunity for teamwork, fine motor skill practice, and creative expression.
Q: What’s the best way to attach decorations without damaging the door?
A: Painter’s tape is the gold standard. For heavier items, use removable adhesive putty (like Sticky-Tak) or double-sided painter’s tape. Avoid duct tape, masking tape, or anything with strong permanent adhesive, as these can strip paint or leave stubborn residue.