Create a Charming DIY Easy Spring Wreath and Unique Spring Door Hangers for Your Front Door
Introduction to Create a Charming DIY Easy Spring Wreath and Unique Spring Door Hangers for Your Front Door
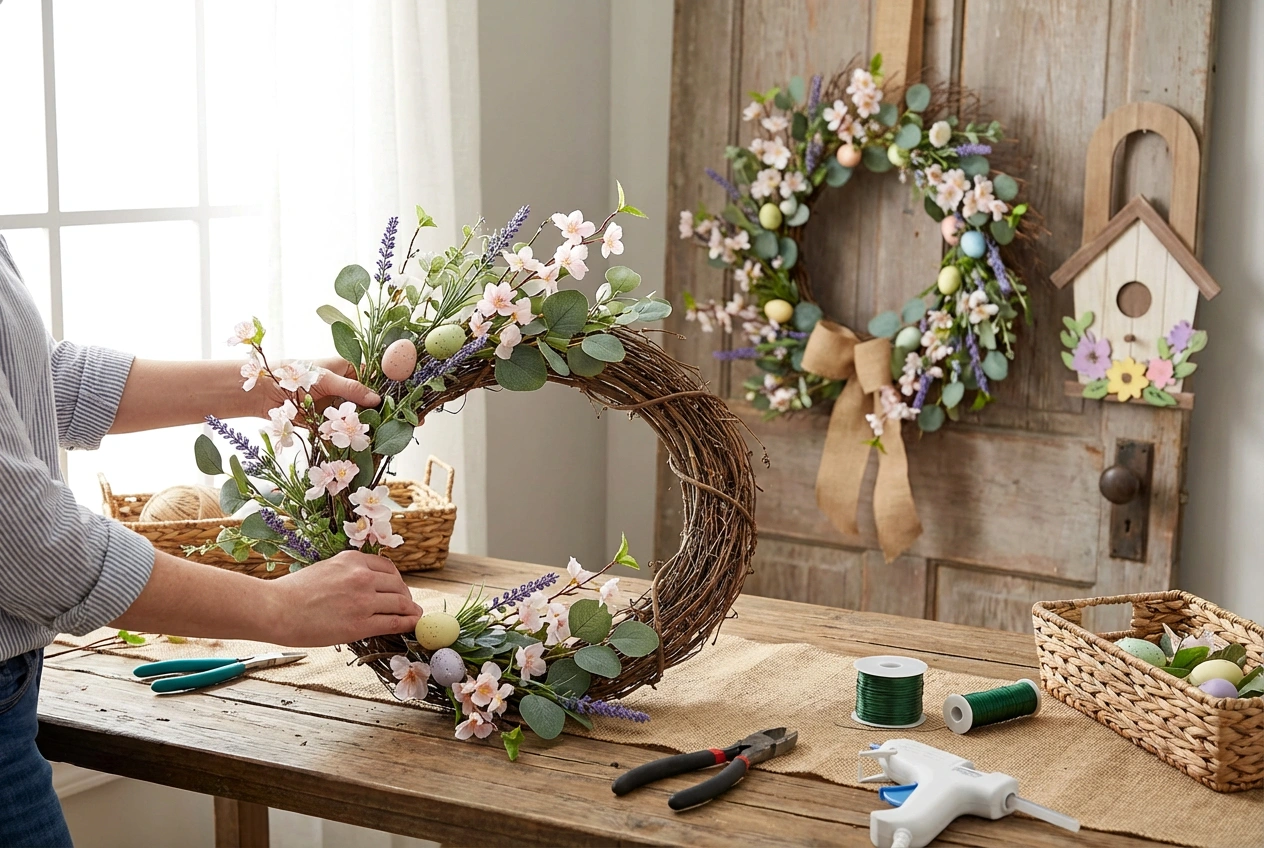
There’s a unique magic to the first days of spring. As the world outside awakens with vibrant blooms and gentle sunshine, our homes deserve a similar infusion of fresh, joyful energy. What better place to start this seasonal transformation than at your very own front door? Consequently, your entryway sets the tone for your entire home, offering a warm, welcoming preview of your personal style. This year, move beyond the expected and embrace the creativity of DIY decor. Specifically, crafting a charming spring wreath and unique spring door hangers is a delightful, budget-friendly project that yields stunning results. Moreover, these handmade creations are more than just decorations; they are expressions of joy and personal artistry that greet you and your guests with a smile. Whether you favor a rustic, wildflower look or a sleek, modern design, the process of making your own front door decor connects you to the season in a deeply personal way. Ultimately, this guide will walk you through creating beautiful, easy-to-make pieces that celebrate renewal and add undeniable curb appeal to your home’s exterior.
Why Choose Create a Charming DIY Easy Spring Wreath and Unique Spring Door Hangers for Your Front Door for Your Space
Choosing to craft your own spring door decor is a decision that pays dividends in aesthetics, personal satisfaction, and even mindfulness. Firstly, DIY spring door decorations offer unparalleled customization. Unlike store-bought items, you control every element—from the color palette and textures to the size and theme. This ensures your creation perfectly complements your home’s exterior paint, architectural style, and your unique taste. For instance, a cottage-style home might sing with a loose, garden-picked wreath, while a modern apartment door could shine with a minimalist geometric door hanger.
Furthermore, the act of creating is inherently rewarding. In a world of mass production, the tactile pleasure of arranging florals, tying ribbons, and assembling materials provides a wonderful creative outlet and a genuine sense of accomplishment. Additionally, these projects are remarkably budget-conscious. With a few key supplies from craft stores, dollar shops, or even your own backyard, you can create a high-impact piece for a fraction of the cost of a designer wreath. This approach is perfect for homeowners, renters, and anyone looking to refresh their space without a major investment.
Finally, seasonal door decor serves as a non-verbal greeting. A cheerful spring wreath or a playful door hanger communicates warmth, care, and a celebratory spirit. It transforms your entry from a simple threshold into an inviting portal. Therefore, by investing time in these projects, you’re not just decorating; you’re enhancing the emotional experience of coming home and welcoming others, making your space feel truly curated and loved.
Key Elements & Design Components
Essential Decor Items for Create a Charming DIY Easy Spring Wreath and Unique Spring Door Hangers for Your Front Door
To embark on your DIY journey, you’ll need a foundation of versatile supplies. Gathering these items first makes the creative process smooth and enjoyable.
- The Base: For wreaths, a grapevine, straw, or foam wreath form is essential. For alternative spring door decor like hangers, consider a wooden plaque, an embroidery hoop, a rustic metal initial, or even a repurposed basket.
- Floral & Foliage: This is the heart of your spring theme. Opt for a mix of silk or dried flowers like tulips, daffodils, peonies, and lavender. Include various greens such as eucalyptus, fern, or boxwood for texture and fullness. Don’t forget foraging for interesting twigs, pussy willows, or seed pods!
- Mechanics & Adhesives: A reliable low-temp glue gun and glue sticks are a DIYer’s best friend. For a non-permanent option, use floral wire or pipe cleaners. For wooden projects, strong craft glue or a staple gun may be necessary.
- Ribbons & Textiles: Ribbons add movement and elegance. Use a beautiful wired ribbon for a large bow, burlap for a rustic touch, or pastel satin for a soft look. Fabric scraps or lace can also create unique accents.
- Embellishments: This is where personality shines. Consider adding elements like painted wooden eggs, miniature birds or butterflies, moss, a cute “Hello Spring” sign, or even small, weather-resistant ornaments.
- Finishing & Protection: If your decor will be exposed to the elements, a clear outdoor sealant spray is crucial to protect colors and materials from sun and rain.
Style Variations & Budget-Friendly Alternatives
The beauty of DIY is its adaptability. Here’s how to tailor your project to any style or budget:
- Modern Minimalist: Use a single hoop as a base. Attach a striking, monochromatic cluster of dried palms or pampas grass. Alternatively, paint a wooden plaque in a soft pastel and hang a simple, abstract felt shape.
- Rustic Garden: A grapevine wreath is perfect here. Tuck in bundles of lavender, sprigs of rosemary, and dried wheat. Use burlap ribbon and add a small bird’s nest for a charming, garden-shed feel.
- Whimsical & Playful: Choose bright, non-traditional colors. Attach oversized felt flowers, pom-poms, or colorful wooden beads. A door hanger shaped like a rainbow or a friendly bee is sure to delight.
- Budget-Friendly Swaps: Instead of silk florals, use pages from an old book or sheet music to create paper flowers. Repurpose ribbon from gifts. Use fallen branches from your yard as a natural wreath base. Thrift stores are treasure troves for baskets, frames, and unique bits that can be repurposed into stunning front door accents.
How to Achieve the Look: Step-by-Step Styling Guide
Follow this detailed guide to create your own beautiful spring door decor from start to finish.
Step 1: Inspiration & Planning
Begin by gathering inspiration. Browse Pinterest, magazines, or your neighborhood. Decide on a cohesive color palette (e.g., soft blush and sage, vibrant yellow and blue, or monochromatic white and green). Simultaneously, measure your door to determine the ideal size for your wreath or hanger. Sketch a rough idea to guide your material purchases.
Step 2: Gathering Your Materials
With your plan in hand, shop for your base, florals, and embellishments. Remember the essential tools: wire cutters, glue gun, scissors, and possibly floral wire. If you’re creating a door hanger, ensure you have a strong hanging mechanism, like a ribbon loop or a sawtooth hanger.
Step 3: Preparing the Base
For a wreath, fluff and shape your grapevine or moss base. For a wooden plaque, sand the edges and paint it in your chosen color, allowing it to dry completely. This foundational step ensures a professional-looking result.
Step 4: Creating a Focal Point
Every great piece needs a visual anchor. This could be a large, beautiful flower, a striking bow, or a central embellishment like a monogram. Build this element separately before attaching it to the base. For a bow, use wired ribbon and secure the center with floral wire.
Step 5: Arranging & Attaching Elements
Now, bring your design to life. Start by laying out all your foliage and flowers on the base without glue. Play with the arrangement until it feels balanced. Generally, work in odd-numbered clusters for a natural look. Once satisfied, begin attaching pieces. Use hot glue for a permanent hold on a wreath form, or weave stems into a grapevine base. For a door hanger, secure elements firmly with glue.
Step 6: Adding Depth & Texture
Avoid a flat, two-dimensional look by layering. Place some elements deeper into the wreath and let others protrude. Add sprigs of berries, pieces of moss, or smaller filler flowers to create visual interest and depth. This step is what makes your decor look lush and professional.
Step 7: The Final Embellishments
Attach your prepared focal point. Then, add the special details: a trailing ribbon, a tiny bird, or scattered pearl accents. Step back frequently to assess the balance. Less is often more; you want a cohesive look, not a cluttered one.
Step 8: Securing & Hanging
Finally, ensure everything is securely attached. For outdoor use, apply a light coat of UV-protectant spray. Add your hanger. Use a sturdy over-the-door wreath hanger or a command hook for painted doors to avoid damage. Then, stand back and admire your handcrafted welcome!
Elevating the Look: Advanced Styling Tips
To take your DIY spring door decor from great to exceptional, consider these pro tips.
- Lighting Magic: If your door is in a covered area, weave a strand of tiny, weatherproof fairy lights into your wreath for a magical evening glow.
- Symmetry vs. Asymmetry: A perfectly symmetrical wreath feels formal and elegant. An asymmetrical design, with elements cascading to one side, feels dynamic and modern. Choose based on your home’s style.
- Mix Materials: Combine unexpected textures for high-end appeal. Pair smooth ceramic eggs with rough moss, or silky ribbon with nubby burlap and delicate dried flowers.
- Create a Coordinating Pair: Don’t stop at the front door. Make a smaller, matching wreath or hanger for your interior mudroom door or a focal wall. This creates a beautiful, flowing theme from the outside in.
- Consider Scale: A large, dramatic door can handle a big, bold wreath. For a standard door, keep your decor proportionate—generally no larger than one-half to two-thirds the door’s width.
Maintenance & Care: Keeping Your Space Fresh
Your beautiful creations can last through the season and beyond with proper care.
- Dusting: Gently dust your wreath or door hanger weekly with a hairdryer on a cool, low setting or a soft brush to prevent pollen and dust buildup.
- Weather Protection: If a sudden storm is forecast, consider temporarily bringing your decor indoors. The UV-protectant spray will help, but prolonged direct sunlight and heavy rain can fade and damage most materials.
- Storage: When the season ends, store your decor properly. Place it in a sturdy, plastic bin with a lid. You can use tissue paper to cushion delicate flowers. Store the box in a cool, dry place to prevent moisture damage.
- Refreshing: Next spring, you can easily refresh your piece. Simply remove any faded elements and glue in a few new sprigs of greenery or flowers for an updated look without starting from scratch.
FAQs: Frequently Asked Questions About Create a Charming DIY Easy Spring Wreath and Unique Spring Door Hangers for Your Front Door
Q: I’m not crafty at all. Are these projects really easy?
A: Absolutely! Start with a simple design, like a moss wreath with three large pre-made fabric flowers. The step-by-step guide breaks it down into manageable steps. Furthermore, many craft stores sell floral picks that are already beautifully arranged—you simply attach them to a base.
Q: How can I make my spring door hangers weatherproof?
A: The key is material choice and sealing. Use silk flowers rated for outdoors, treated wood, and plastic or ceramic embellishments. Most importantly, finish your piece with several light coats of a clear, outdoor-rated acrylic sealant spray.
Q: My front door gets a lot of sun/wind. What’s the most secure way to hang my decor?
A: For windy areas, secure your wreath with a ribbon tied to the top of your door and a wreath hanger over the door for double security. For sun exposure, prioritize UV-resistant materials and sealants, and consider rotating your decor with a shaded side periodically.
Q: Can I use fresh flowers for my spring wreath?
A: While beautiful, fresh flowers wilt quickly. For longevity, use high-quality silk or preserved/dried florals. However, you can create a stunning temporary piece with fresh blooms using floral foam soaked in water, but plan for it to last only a few days.
Q: How do I choose a color scheme that won’t clash with my front door color?
A: Use a color wheel for guidance. A navy blue door pops with coral and white. A red brick house with a black door shines with bright yellows and greens. Alternatively, take a photo of your door and use a photo-editing app to “test” different color schemes digitally before you buy supplies.