Creative DIY Black History Month Door Decorations to Celebrate and Educate
Introduction to Creative DIY Black History Month Door Decorations to Celebrate and Educate
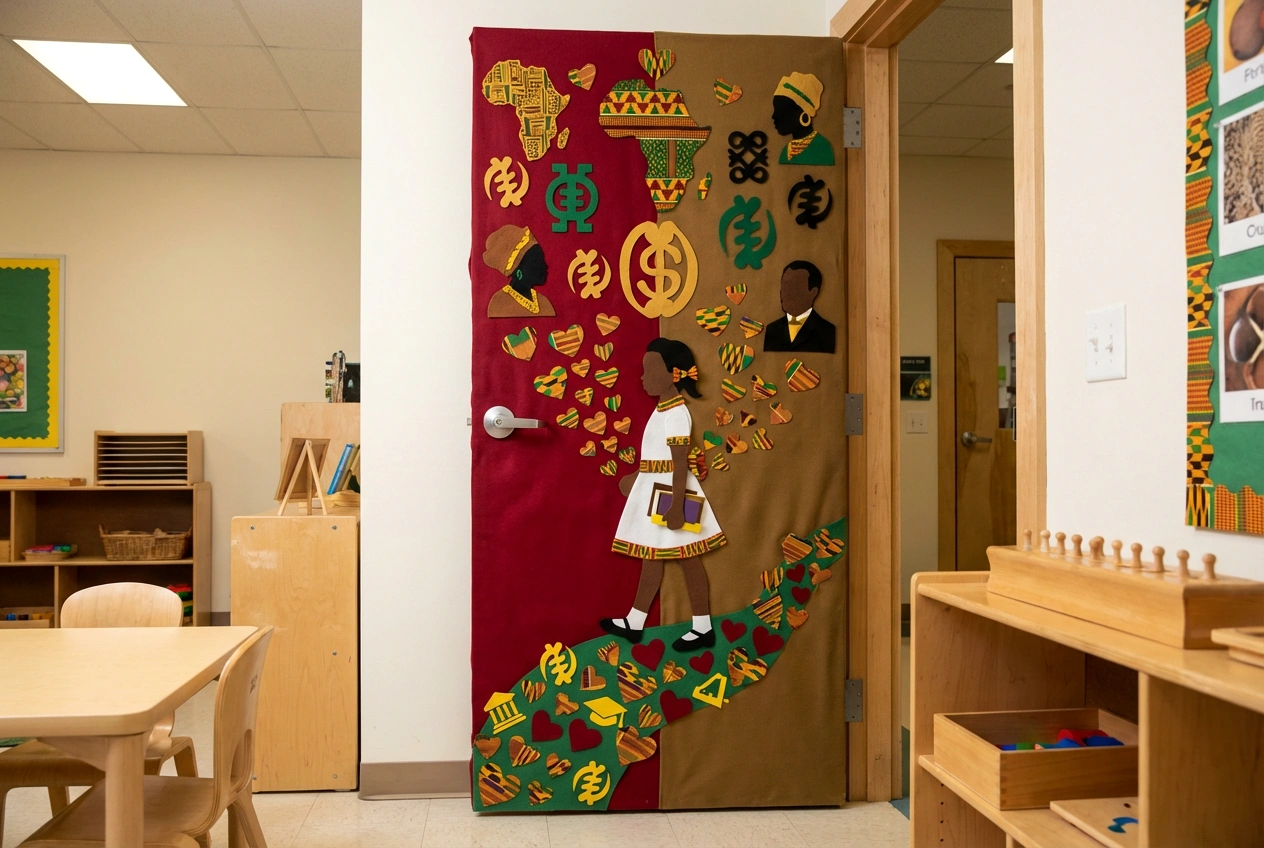
Every February, our homes and communities have a powerful opportunity to become vibrant canvases for celebration, reflection, and education. One of the most impactful and personal ways to participate is by creating your own Black History Month door decorations DIY projects. This tradition, deeply rooted in the spirit of “door-dressing” seen in many African American communities and academic institutions, transforms a simple entryway into a statement of pride, history, and hope. More than just a seasonal craft, these decorations serve as a daily reminder of the resilience, brilliance, and profound contributions of Black individuals throughout history. For the home decor enthusiast, this is a chance to blend artistry with activism, creating a focal point that is both aesthetically stunning and emotionally resonant. Whether your style is minimalist and modern, bold and graphic, or layered with tactile textures, a DIY Black History Month door design allows you to personalize your tribute. This guide will inspire you to craft a door display that not only beautifies your space but also sparks conversation, fosters learning, and honors a legacy of excellence right at your threshold.
Why Choose Creative DIY Black History Month Door Decorations to Celebrate and Educate for Your Space
Opting to create your own Black History Month door art is a transformative choice for several compelling reasons. Firstly, it injects profound meaning and personal connection into your home decor. Unlike store-bought items, a DIY project allows you to tailor the theme, colors, and message to reflect what resonates most with you and your family. You might choose to celebrate iconic figures, highlight cultural motifs like Adinkra symbols or Kente cloth patterns, or focus on empowering themes like “Black Excellence” or “Future Leaders.” This personalization ensures your decoration is unique and heartfelt.
Secondly, these projects are incredibly versatile and inclusive. Regardless of your skill level or budget, there are countless approaches. A renter can use removable adhesives and paper crafts, while a homeowner might incorporate woodwork or fabric. For families, it’s a collaborative, educational activity that brings everyone together. For styling professionals, it’s an opportunity to showcase creative flair with a socially conscious message. Furthermore, a beautifully crafted door display enhances your home’s curb appeal or interior hallway aesthetic, serving as a powerful first impression for guests. It communicates values of awareness, celebration, and continuous learning. Ultimately, dedicating time to this creative act is a form of active participation in Black History Month, moving beyond passive consumption to engaged creation and celebration.
Key Elements & Design Components
Essential Decor Items for Creative DIY Black History Month Door Decorations to Celebrate and Educate
To bring your visionary door display to life, you’ll need a blend of foundational materials and thematic elements. Start with a cohesive color palette. Traditional Pan-African colors—red, black, green, and sometimes yellow—are powerful and instantly recognizable. Alternatively, you might choose a more subdued or metallic scheme (golds, deep purples, rich browns) for an elegant look.
Base Materials: Your canvas starts here.
* Bulletin Board Paper or Wrapping Paper: An affordable, easy-to-work-with background.
* Fabric: Scraps of Ankara, Kente-patterned, or solid-colored fabric add wonderful texture.
* Removable Wallpaper: For a sleek, modern background that peels off easily.
* Cardstock & Construction Paper: Essential for creating shapes, letters, and silhouettes.
Thematic Elements: These carry your message.
* Portraits & Silhouettes: Printed or drawn images of historical figures, family members, or symbolic silhouettes.
* Inspirational Quotes: Use vinyl lettering, stencils, or printed text featuring words from luminaries like Maya Angelou, James Baldwin, or Dr. Martin Luther King Jr.
* Cultural Symbols: Incorporate shapes like Africa, hearts, fists, or Adinkra symbols (like Gye Nyame, Sankofa).
* 3D Elements: Artificial afro picks, mini books, musical notes, or small gears (representing invention) add depth.
Tools & Adhesives:
* Scissors, X-Acto Knives, Cutting Mats
* Double-Sided Tape, Glue Dots, Poster Putty: Ideal for renters and damage-free hanging.
* Hot Glue Gun: For securing heavier 3D items.
* Frames (optional): Inexpensive plastic frames can give portraits a polished look.
Style Variations & Budget-Friendly Alternatives
Your door decor can adapt to any aesthetic or financial plan. For a Modern Graphic style, use clean lines, bold typography on a solid background, and a limited color scheme. Think geometric shapes and minimalist portraits. A Textured & Cultural style embraces fabric swatches, raffia, woven baskets as borders, and layered paper elements for a rich, tactile feel.
Budget-conscious creators have a world of options. Instead of buying new fabric, repurpose old clothing or scarves with meaningful patterns. Use free online resources and your home printer for portraits and quotes. Thrift stores are treasure troves for frames, books, and other items that can be upcycled. For a quick, high-impact project, focus on one powerful element—a single, large quote in beautiful lettering surrounded by a simple paper wreath of green, black, and red can be just as striking as a more complex scene. Remember, the power is in the intention and creativity, not the price tag.
How to Achieve the Look: Step-by-Step Styling Guide
Crafting your door decoration is a rewarding process. Follow these steps to ensure a beautiful, durable result.
Step 1: Concept and Theme Selection
Begin by deciding on your core message. Will you honor specific inventors, celebrate artists and musicians, or focus on a theme like “Dream Like Martin” or “Nevertheless, She Persisted”? This decision will guide all your subsequent choices. Research your theme and gather inspirational images.
Step 2: Design and Layout Planning
Measure your door. Sketch a rough layout on paper. Decide where your focal point (e.g., a central portrait or quote) will go and how supporting elements will be arranged. Balance is key—avoid overcrowding. Use this plan as your blueprint.
Step 3: Background Creation
Prepare your background. If using paper, cut it to fit your door and secure it at the top with painter’s tape or removable adhesive strips. For a fabric background, you can lightly starch and smooth it onto the door, tacking it at the corners. Ensure your background is smooth and secure before adding any elements.
Step 4: Element Creation and Cutting
This is the heart of your DIY Black History Month door project. Carefully cut out your portraits, letters for quotes, and symbolic shapes. Use cardstock for sturdier elements. If painting, allow ample drying time. For a professional touch, consider using a Cricut or Silhouette machine for precise cuts.
Step 5: Composition and Adhesion
Before any permanent sticking, lay all your elements on the background according to your plan. Take a step back and adjust for visual balance. Once satisfied, begin adhering items. Start with the largest or central pieces first, using your chosen adhesives. Use a level for straight lines of text.
Step 6: Adding Depth and Detail
Incorporate your 3D elements. Hot glue small items like artificial flowers, gears, or musical notes around your central design to create shadows and interest. You can add a border made of paper chains, fabric strips, or a wreath to frame the entire display.
Step 7: Final Review and Lighting
Examine your door from different angles and distances. Ensure everything is secure. If your door is in a dim area, add a small, safe battery-operated LED clip light at the top to illuminate your work, making it visible day and night.
Elevating the Look: Advanced Styling Tips
To truly make your Black History Month door decoration stand out, consider these polished touches. Layering is a professional secret. Instead of placing everything flat on the background, use foam adhesive dots behind some elements to make them pop forward. This creates a dynamic, gallery-like effect. Typography mixing can add sophistication. Pair a elegant script font for a main quote with a clean, sans-serif font for names and dates.
Think beyond the door itself. Extend the theme subtly into the surrounding space. Place a small stack of relevant books on a nearby console table with a themed vignette. A complementary wreath on a wall opposite the door can create a powerful sightline. For lighting, a warm, focused spotlight can dramatize the display in the evening, casting intriguing shadows and drawing the eye. Finally, incorporate interactive elements. A small pocket or envelope on the door holding printed mini-biographies of the figures you’ve featured invites engagement and learning, transforming your decoration from a static display into an educational resource.
Maintenance & Care: Keeping Your Space Fresh
Your handmade door decor can last beautifully throughout the month with minimal care. Dust gently using a soft, dry microfiber cloth or a feather duster. Avoid any liquid cleaners on paper elements. If you used removable adhesives, periodically check the corners of your background paper to ensure they haven’t started to peel, especially in areas with sunlight or airflow from vents.
At the end of the month, deconstruct carefully. If you plan to reuse elements (like framed portraits or 3D items), remove them slowly. For paper backgrounds, peel them off in one slow, steady motion to avoid tearing. Store flat elements in a large portfolio or under a mattress to keep them pressed. This care allows you to preserve special pieces for future years or school projects, making your creative Black History Month door craft a part of an ongoing tradition.
FAQs: Frequently Asked Questions About Creative DIY Black History Month Door Decorations to Celebrate and Educate
Q: I’m not artistic. Can I still create a nice door decoration?
A: Absolutely! Many stunning designs rely on printed elements, pre-cut letters, and simple geometric shapes. Using a computer for layout and printing is a huge help. Focus on a clean, well-organized design with meaningful content—the message is the most important part.
Q: How can I make my door decor respectful and accurate?
A: Research is key. Double-check dates, quotes, and historical facts. When portraying individuals, use dignified and accurate images. Aim to celebrate achievements and legacy in a way that honors their full humanity and contribution.
Q: What are some renter-friendly ways to decorate my door without causing damage?
A: Use products like painter’s tape, removable poster putty, and Command™ strips. Fabric can be hung with temporary adhesive hooks at the top. Avoid using tape directly on painted wood doors, as it can strip the finish; instead, apply tape to the back of your paper background and then attach it.
Q: How can I involve my young children in this DIY project?
A: Perfect! Assign age-appropriate tasks: they can color symbols, help apply glue dots, or arrange pre-cut shapes. Use the activity as a teachable moment to discuss the people and concepts you’re featuring. It makes the history tangible and personal for them.
Q: My front door is exposed to the weather. What materials should I use?
A: For outdoor doors, use laminated printed sheets, waterproof vinyl stickers, or weather-resistant fabrics. Secure everything with strong, waterproof adhesives or even clear acrylic sealant spray over paper elements (test first). Avoid anything that will run or warp when wet.