Creative DIY Spring Decor Ideas for a Fresh and Inspiring Home Makeover
Introduction to Creative DIY Spring Decor Ideas for a Fresh and Inspiring Home Makeover
As the last frost melts away and the first green buds appear, a powerful urge to refresh our surroundings takes hold. Spring isn’t just a season outside our windows; it’s a feeling we can cultivate inside our homes. This year, instead of a costly overhaul, embrace the joy of handmade renewal with creative diy spring decor. This approach is about more than just crafting; it’s a transformative practice that infuses your living space with personal energy, light, and a sense of hopeful new beginnings. By incorporating handmade spring decorations, you create an atmosphere that is uniquely yours—full of life, color, and inspiration. Whether your style leans towards modern minimalist, cozy rustic, or vibrant eclectic, the principles of spring DIY revolve around lightness, organic textures, and natural motifs. This guide is designed to inspire homeowners, renters, and design enthusiasts alike to roll up their sleeves and create a home that feels as fresh and alive as the world awakening outside. Let’s explore how simple, budget-friendly projects can lead to a profound and inspiring home makeover.
Why Choose Creative DIY Spring Decor Ideas for a Fresh and Inspiring Home Makeover for Your Space
Opting for a handmade spring refresh offers a multitude of benefits that go far beyond aesthetic appeal. Firstly, it creates an unparalleled emotional connection to your space. Every hand-painted vase, every foraged branch arranged in a jar, carries a story and your personal touch, transforming a house into a true home. This process actively combats the stagnant energy of winter, replacing it with a vibrant, uplifting ambiance that boosts mood and creativity. Furthermore, DIY spring decorating is inherently sustainable and budget-conscious. You can upcycle existing items, use natural materials like branches and stones, and avoid the mass-produced, giving your decor a unique and eco-friendly edge.
From a design perspective, this approach allows for ultimate flexibility. You are not confined to a single store’s collection; instead, you can mix patterns, textures, and colors that genuinely speak to you, achieving a layered, collected-over-time look that professional designers covet. For renters, many projects are non-permanent and easily reversible, offering the freedom to personalize without risking a security deposit. Ultimately, engaging in spring craft ideas is an act of self-care. The mindful process of creating reduces stress and provides a deep sense of accomplishment. When you complete a project and see it enhance your daily environment, you don’t just see a decoration—you see a testament to your own capability and creativity, making your space not only beautiful but also empowering.
Key Elements & Design Components
Essential Decor Items for Creative DIY Spring Decor Ideas for a Fresh and Inspiring Home Makeover
To capture the essence of spring indoors, focus on elements that mimic the season’s natural rebirth. Here are the essential components for your handmade seasonal refresh:
- A Light & Airy Color Palette: Move away from heavy winter hues. Embrace a foundation of whites, creams, and soft neutrals, then accent with the gentle colors of spring: sage green, sky blue, buttery yellow, and blush pink. These can be introduced through paint, textiles, or decorative accessories.
- Natural Materials & Textures: This is the heart of spring crafting. Incorporate untreated wood, woven rattan, linen, cotton, terracotta, and seagrass. Think of a jute-wrapped vase, a linen table runner, or a set of wooden bead garlands.
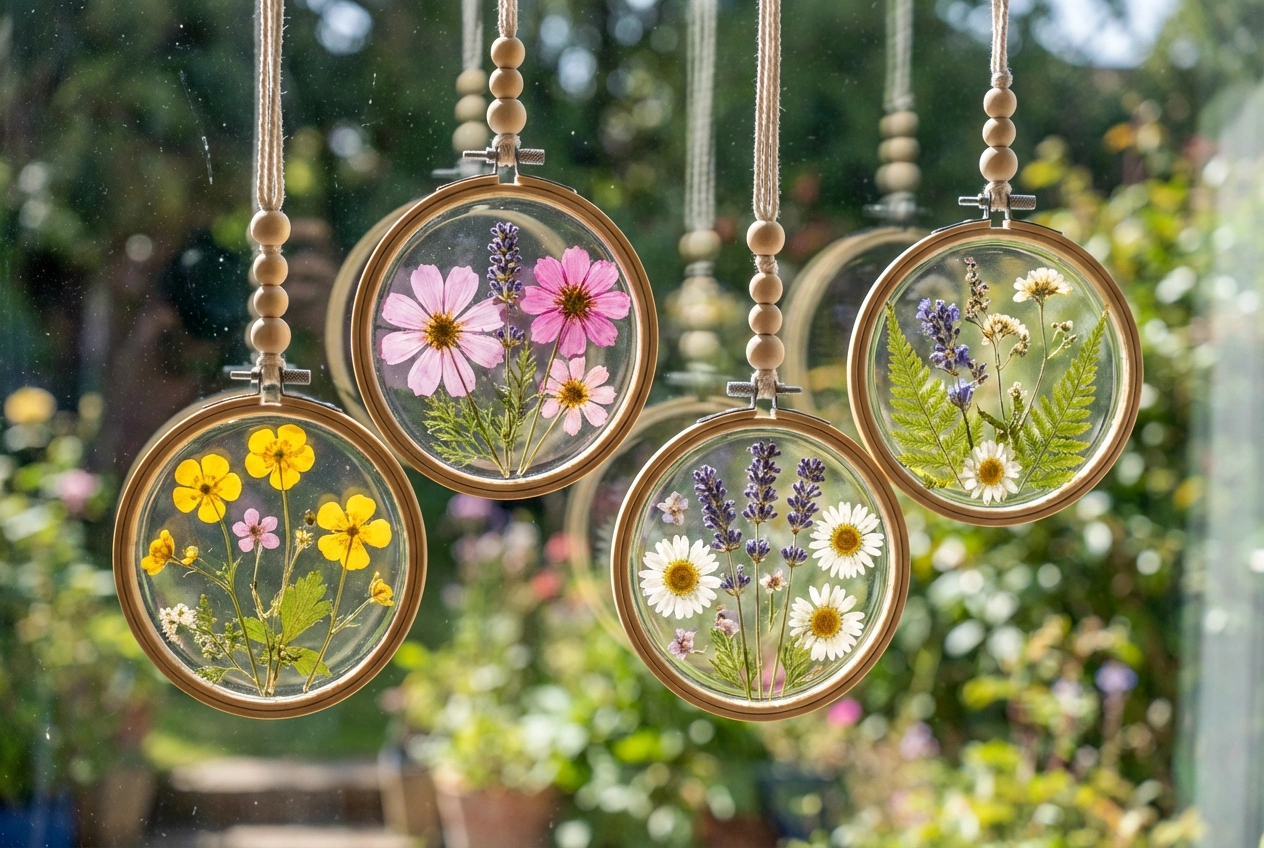
- Botanical Elements (Real & Crafted): Fresh flowers and budding branches (like forsythia or cherry blossoms) are instant mood-lifters. For longer-lasting options, create your own paper flowers, press real blooms in frames, or craft a wreath from faux greenery and dried elements.
- Reflective Surfaces & Light: Maximize natural light by cleaning windows and using sheer curtains. Add mirrors to bounce light around, and incorporate glass vases, mercury glass candles, or metallic accents in brass or copper to mimic the glint of spring sunshine.
- Handmade Textiles: Swap out heavy wool throws and dark pillows for lighter options. Try your hand at dip-dying napkins, sewing simple linen cushion covers, or creating a macramé wall hanging to add softness and texture.
- Upcycled & Painted Accents: Give old items new life. A coat of pastel chalk paint can transform a tired picture frame or a wooden stool. Decoupage vintage botanical prints onto trays or storage boxes for a personalized touch.
Style Variations & Budget-Friendly Alternatives
The beauty of DIY home decor for spring is its adaptability. Here’s how to tailor the look to your style and budget:
- For a Modern Minimalist: Focus on clean lines and a restrained color palette. Choose one or two natural elements, like a single sculptural branch in a sleek vase or a set of identical terracotta pots planted with simple greenery. Your spring DIY projects might involve creating geometric concrete planters or framing a single, large pressed leaf.
- For a Cozy Cottage-Core: Embrace abundance and whimsy. Layer different textures like crochet, linen, and chunky knit. Create a mismatched bouquet of handmade fabric flowers, display a collection of painted birdhouses, or craft a wreath from foraged moss and twigs.
- Budget-Friendly Swaps: You don’t need to buy new. Use jars and bottles as vases, paint rocks from the garden as paperweights, and frame beautiful pages from old gardening books. Instead of buying expensive art, create a gallery wall of your own watercolor botanicals or leaf-print patterns. For a temporary splash of color, use washi tape to create a geometric accent wall or drawer-front design.
How to Achieve the Look: Step-by-Step Styling Guide
Follow this actionable guide to systematically bring the freshness of spring into every corner of your home.
Step 1: Declutter and Deep Clean
Begin your seasonal transformation with a physical and visual reset. Clear surfaces of winter clutter, dust shelves, and wash windows to let in maximum light. This clean slate is essential; it allows the new, lighter elements of your spring crafting to shine without competition.
Step 2: Establish Your Spring Color Story
Select a primary neutral base (e.g., white, beige, light grey) and 2-3 accent colors inspired by spring (e.g., sage + blush, sky blue + butter yellow). Apply this palette consistently across different rooms for a cohesive flow. You can introduce these colors through a large item like a painted accent chair or small touches like DIY throw pillows and painted ceramic pots.
Step 3: Craft Your Botanical Focal Points
Create 2-3 signature handmade botanical pieces. This could be a large dried floral arrangement for the dining table, a spring-themed wreath for your front door, or a series of framed pressed flowers for the hallway. These projects become the artistic anchors of your seasonal refresh.
Step 4: Layer in Natural Textiles
Swap out heavy fabrics. Replace dark curtains with airy linen or cotton blends. Layer a lightweight, textured throw over your sofa and add cushion covers in your spring accent colors. Try a simple DIY like fringing the edges of plain tea towels for a boho touch in the kitchen.
Step 5: Illuminate with Reflective Decor
Strategically place mirrors opposite windows. Group clear glass vases of different heights on a tray. Create a centerpiece with candle holders of varying materials—glass, polished metal, white ceramic. A simple DIY is to spray paint old bottles in metallic gold or copper for instant glamour.
Step 6: Refresh Surfaces with Upcycled Accents
Look at your existing decor with a new eye. Can that wooden bowl be sanded and re-stained? Can those plain photo frames be painted a soft green? Create a set of coasters using sliced wood rounds or decorative tiles. This step personalizes your space without new purchases.
Step 7: Incorporate the Scent of Spring
Finally, engage the sense of smell, a powerful trigger for mood. Make your own natural potpourri with dried citrus slices, cinnamon sticks, and cloves. Create linen sprays with essential oils like lavender, grapefruit, or eucalyptus. This sensory layer completes the immersive spring experience.
Elevating the Look: Advanced Styling Tips
Once your foundational spring diy projects are in place, these advanced tips will add polish and sophistication to your handmade decor.
- Create Dynamic Vignettes: Instead of lining items up on a shelf, style them in odd-numbered groups (3s or 5s) with varying heights. Place a tall, crafted vase next to a stack of books and a small sculptural object. This creates visual interest and tells a mini-story.
- Play with Scale: Introduce one unexpectedly large element, like an oversized abstract painting with spring colors or a giant paper flower on the wall. Conversely, a collection of very small, delicate items (like tiny terracotta pots with succulents) can be charming.
- Mix High and Low: Don’t be afraid to pair a cherished, expensive item with a humble DIY creation. A designer lamp looks even more striking next to a hand-painted thrift store vase. This mix adds depth and personality.
- Extend the Theme to Unexpected Places: Hang a small, simple wreath on a bathroom mirror or above the kitchen sink. Place a tiny pot of herbs or a single bloom in a vintage shot glass on your office desk. These small touches create delightful surprises throughout the day.
- Focus on Artistic Lighting: Swap out lamp shades for lighter-colored or natural textured ones. Use string lights with botanical motifs (like leaf-shaped bulbs) inside a glass cloche or draped over a headboard for a magical evening glow.
Maintenance & Care: Keeping Your Space Fresh
Maintaining your handmade spring haven ensures it stays inspiring throughout the season. For your DIY creations, dust delicate paper flowers and dried arrangements gently with a soft brush or a hairdryer on a cool, low setting. Refresh real flowers regularly; even a single stem in a bud vase can have a big impact. Launder your lighter spring textiles according to their care labels to keep them looking crisp. Furthermore, as the season progresses, don’t be afraid to edit. Rotate your handmade pieces from room to room for a new perspective. If a project fades or you tire of it, compost natural materials and repurpose others. The cycle of creating, enjoying, and refreshing is part of the sustainable, joyful practice of seasonal diy home decor.
FAQs: Frequently Asked Questions About Creative DIY Spring Decor Ideas for a Fresh and Inspiring Home Makeover
Q: I’m not crafty at all. Where should I start with DIY spring decor?
A: Begin with the simplest projects that have high visual impact. Painting terracotta pots, arranging fresh branches in a vase, or tying pretty ribbons onto existing curtain tie-backs are foolproof starts. The goal is the experience and personal touch, not perfection.
Q: How can I incorporate spring DIY ideas in a small apartment without clutter?
A: Focus on vertical space and dual-purpose items. Create a wall-mounted hanging planter from macramé, use a decorative spring-themed tray to corral items on a coffee table, or choose a mirror with a hand-painted frame that adds style while making the room feel larger.
Q: My home has a dark color scheme. Will pastel spring DIYs look out of place?
A: Not at all! Instead of full pastel walls, use richer, deeper spring tones as accents. Think emerald green, navy blue, or mustard yellow. Incorporate natural textures like dark woven baskets, wood tones, and brass accents. A bouquet of white blooms or a pop of green from a DIY wreath will still feel fresh and intentional against a darker backdrop.
Q: What are the best long-lasting alternatives to fresh flowers?
A: Excellent options include high-quality faux stems (look for silk or latex), dried flowers (pampas grass, lavender, statice), preserved greenery like eucalyptus, and forced branches that can later be dried. You can also craft beautiful paper or fabric flowers that last for years.
Q: How do I store my DIY spring decorations for next year?
A: Wrap fragile items in tissue paper and store in labeled plastic bins. For wreaths, use a dedicated wreath storage bag or a hanging garment bag. Store dried arrangements in a cool, dry place, ideally in a box to prevent dust accumulation. Proper storage protects your handmade treasures for many seasons to come.